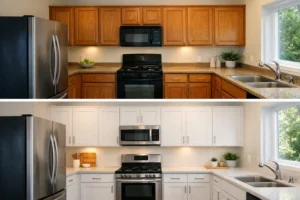
A kitchen can look tired long before it stops working. If your cabinet boxes are solid, the layout still serves your family, and you are ready for a meaningful visual change, refacing can offer a far more manageable path than removing everything. This guide to cabinet refacing timelines separates the time you spend planning from the brief period of work inside your home, so you can plan with confidence.
The headline is simple: most cabinet refacing installations are completed in 2-3 days. That does not mean a project begins the week after a first conversation. Your doors, drawer fronts, and finishes are custom-made to fit your kitchen, and careful preparation is what makes installation move quickly when the day arrives.
Kitchen Facelift is your planning expert if you live in the Greater Hamilton Area.
Click to see the map for the area (Oakville to Hamilton to Niagara and north to Milton).
The Cabinet Refacing Timeline at a Glance
A refacing project has two distinct timelines. The first happens before installation: consultation, design decisions, precise measurements, and Canadian manufacturing. The second is the work in your kitchen. Homeowners often focus on the latter because it affects daily life most directly, but both phases matter.
The pre-installation phase varies by project scope, selected materials, and production schedules. A straightforward door-and-drawer-front refresh generally takes less coordination than a kitchen that also includes a new countertop, backsplash removal, appliance changes, or a door-to-drawer conversion. A thoughtful consultation gives you a more accurate expectation for your own home rather than a generic promise.
Once every detail is confirmed and the custom components are ready, the installation itself is typically measured in days, not weeks. That is the central advantage for households that want a dramatic change without turning the kitchen into a long-term construction zone.
Phase 1: Start With a Clear, Practical Conversation
The process should begin with your goals, not a sales pitch. Are you happy with the footprint but ready for a brighter finish? Do you want more functional drawers? Are you working around an existing granite or quartz countertop you want to preserve? These answers shape the scope and the schedule.
Many homeowners can begin with photos and a virtual estimate. This is a useful early step because it provides ballpark pricing and helps determine whether refacing is the right fit before anyone spends time on a detailed visit. It also lets you raise timing questions early, especially if you are planning around a family event, a move, or a countertop installation.
An in-home consultation follows when the project moves forward. Physical samples make a difference here. A finish that looks warm on a screen may read differently beside your flooring, wall color, and natural light. This visit is also when a specialist assesses the condition of the cabinetry, measures precisely, and identifies adjustments that may affect the final timeline.
What can add time before installation?
Custom work deserves enough lead time to be done properly. Adding drawers where doors once were, modifying cabinetry for an appliance, or coordinating a quartz countertop requires additional planning. None of these steps are a problem, but they should be discussed upfront rather than treated as a last-minute surprise.
Material availability and finish selection can also influence production timing. The most useful approach is to choose a finish you genuinely love, then schedule installation around realistic readiness dates. Rushing a design decision to save a few days rarely feels worthwhile once you live with the result every day.
Phase 2: Measurements, Design Confirmation, and Custom Production
Cabinet refacing is not a matter of selecting off-the-shelf doors and hoping they fit. Each kitchen is measured so new doors and drawer fronts align properly with the cabinet boxes you are keeping. That precision is a major reason refacing can look like a full transformation while preserving the structure that still works.
Before production begins, the project details need to be confirmed. This includes door style, finish, hardware, drawer configurations, and any agreed adjustments to the existing cabinetry. It is the point where good communication prevents delays later. If you are uncertain about a handle finish or whether to retain a particular cabinet door, raise it before manufacturing starts.
During production, your kitchen remains largely untouched. You can continue using it normally because the disruption has not yet begun. For busy households, this is a meaningful difference from a full renovation, where demolition often starts well before replacement materials are ready.
Kitchen Facelift uses custom-fit, Canadian-made components designed for the specific kitchen being transformed. That approach is not about making the process longer. It is what allows the installer to arrive with the right materials, complete the work efficiently, and leave you with a finished space that feels intentional rather than pieced together.
Phase 3: What Happens During the 2-3 Day Installation
The exact sequence depends on your scope, but the installation period is focused and organized. Existing doors and drawer fronts are removed. Cabinet exteriors are prepared and refaced, then new custom doors, drawer fronts, and hardware are installed. Final adjustments ensure reveals are even, doors operate correctly, and drawers sit properly.
If your project includes cabinetry modifications, such as converting doors to drawers or creating space for a new appliance, those are completed as part of the agreed scope. Necessary backsplash removal or countertop preparation may also be coordinated when required. The goal is to do only the demolition that supports the finished design, not create disruption for its own sake.
For most homeowners, the practical reality is a short period of limited kitchen access. You may want to plan simple meals, keep the coffee maker in another room, and clear personal items from countertops and cabinets before the team arrives. You do not need to pack up your entire home or prepare for weeks of dust and noise.
Day one: Preparation and transformation begins
The first day is usually about protecting the work area, removing the pieces being replaced, and preparing the cabinet surfaces. Once the new doors and drawer fronts begin going on, the transformation becomes visible quickly. This is often the moment homeowners see how much their existing layout can change without being torn out.
Day two: Installation, hardware, and adjustments
The second day commonly includes continued installation, hardware placement, and careful alignment. Kitchens with a typical refacing scope can often be completed within this window. More involved projects may continue into a third day to allow the same level of care around modifications and finishing details.
Day three, when needed: The finishing work
A third day is not a sign that anything has gone wrong. It can simply reflect a larger kitchen, additional drawer conversions, appliance adjustments, or details that deserve more time. The right timeline is one that protects the quality of the final result while still keeping the interruption to your routine short.
How to Keep Your Refacing Project on Schedule
Homeowners have more influence over the timeline than they may realize. Timely decisions on finishes, hardware, and scope allow custom production to begin without unnecessary pauses. Before installation, clear countertops, remove items from the cabinets being worked on, and make sure installers have a clear route into the kitchen.
It also helps to treat related work as one coordinated plan. If you are replacing countertops, installing a new backsplash, or changing appliances, ask how those pieces should be sequenced. A cabinet refacing specialist can explain what needs to happen before, during, or after the refacing work so trades do not overlap in ways that create avoidable delays.
Be honest about immovable dates. If you are hosting family, preparing to list your home, or returning from travel, mention it during the first conversation. A good team will tell you what is realistic and help you choose a schedule that does not create unnecessary stress.
When Refacing May Take Longer Than Expected
The 2-3 day installation expectation applies to most standard transformations after materials are ready. It is not a guarantee that every kitchen has the same needs. Cabinets with structural damage, significant water issues, or a layout that must be completely reconfigured may call for a different solution and a longer project.
The same is true when several upgrades are combined. Refacing pairs beautifully with new counters, but countertop templating and fabrication follow their own schedule. Appliance availability, electrical changes, and tile work can also extend the broader project calendar. The benefit of a custom assessment is knowing these factors before work begins, not discovering them midway through.
A well-planned refacing project should feel refreshingly contained: a careful design process, custom-made components, and a short, professional installation that respects your home. Put the kettle somewhere accessible, choose a few easy meals for installation days, and look forward to seeing a kitchen you already know become one you are excited to use again.