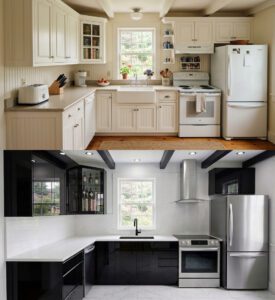
A cabinet refacing project can change the feeling of your kitchen in just a few days – but a great result starts before installation day. Knowing how to prepare for cabinet refacing helps you make the right design decisions early, protect the parts of your kitchen you love, and give your installers a clear, comfortable space to work.
For many homeowners, especially those with solid cabinetry from the 1980s or 1990s, refacing is a thoughtful alternative to tearing everything out. If the cabinet boxes are structurally sound and the layout still works for your household, new doors, drawer fronts, finishes, and carefully planned updates can make the room feel entirely new without turning your home upside down.
Kitchen Facelift is your planning expert if you live in the Greater Hamilton Area.
Click to see the map for the area (Oakville to Kitchener/Cambridge and north to Milton).
Start by Confirming What Will Stay and What Will Change
Cabinet refacing preserves the cabinet boxes, so the first question is simple: are you happy with the kitchen’s footprint? You do not need to love every detail. A dated door style, limited drawers, worn finishes, or an awkward valance can all be addressed. But if you want to move plumbing, remove walls, or significantly relocate major appliances, a larger renovation may be the better fit.
Look at your kitchen through the lens of daily use. Are the cabinets sturdy? Do the doors and drawers operate reasonably well? Is there water damage around the sink, a sagging cabinet, or a persistent moisture issue that needs repair first? An experienced refacing specialist will assess these details during an in-home visit and explain what is practical.
This is also the time to think beyond doors. Many homeowners choose to convert a lower cabinet into drawers, update a pantry configuration, remove a backsplash, or make adjustments for a new appliance. These are meaningful improvements, but they need to be planned before measurements and manufacturing begin.
How to Prepare for Cabinet Refacing Decisions
The most efficient projects are not rushed. Before your consultation, gather a few photos of kitchens you genuinely like. Notice what is drawing you in. It may be the warmth of a wood tone, the clean lines of flat-panel doors, the contrast of a darker island, or simply the calm of less visual clutter.
Try to separate a passing trend from a finish you will enjoy for years. Your kitchen needs to work with the flooring, wall color, natural light, and furnishings around it. Physical door and finish samples are especially helpful here. A color that looks perfect on a phone screen can read very differently beside your existing countertop or in afternoon light.
If more than one person is involved in the decision, agree on the priorities before the appointment. You may be balancing a brighter look, more functional storage, a countertop update, and a project timeline around family life. There is no universal right answer, but clear priorities make every later choice easier.
Decide on Countertops Before Final Measurements
Countertops and cabinet refacing are closely connected. If you are keeping an existing granite or quartz countertop, tell your specialist early. The work should be planned to complement and protect that investment.
If you intend to install new quartz, decide whether the countertop work will happen before or after refacing. Cabinet modifications, such as converting doors to drawers or adjusting cabinetry for an appliance, can affect the final countertop template. Coordinating the sequence prevents unnecessary rework and helps create the crisp, finished fit homeowners expect.
Think Through Appliances and Backsplashes
Measure new appliances carefully, including handles, ventilation requirements, and clearance for doors and drawers. A refrigerator that is deeper or wider than the previous model can affect surrounding panels and cabinetry. The same applies to a new range, microwave, dishwasher, or hood.
Backsplashes deserve early attention too. If a backsplash is being replaced, it may need to come off before the refacing work begins. If it is staying, its edges and condition should be assessed as part of the plan. A clear conversation up front is far better than discovering a detail that limits your options once work is underway.
Prepare Your Kitchen for a Respectful Installation
Most cabinet refacing installations are completed in two to three days, not weeks. That shorter timeline is one of the biggest advantages, but it does mean the installation team needs access to the kitchen and room to move safely.
A few days before the scheduled start, empty the cabinets, drawers, pantry areas, and any nearby storage that may be affected. This is a good opportunity to set aside expired pantry items, duplicate utensils, and the small appliances that no longer earn their counter space. Keep daily essentials in a labeled bin so breakfast and school lunches are still manageable.
Clear the countertops as well, including décor, coffee makers, knife blocks, and anything stored on top of upper cabinets. Remove items from nearby open shelving or a dining area if they are close to the work zone. Your installer will take care around your home, but a clear space helps protect your belongings and keeps the work moving efficiently.
For households with children or pets, make a plan for the installation days. A separate room, a visit with family, or a quiet day out can make the experience easier for everyone. There will be tools, materials, and professionals moving in and out of the area, so the kitchen should be treated as a work zone until the project is complete.
Make Access Easy Before the Team Arrives
Good preparation is not about doing the installer’s work for them. It is about removing avoidable obstacles. Make sure there is a clear path from the entry point to the kitchen, including hallways and stairs. Move delicate furniture, rugs, or wall art that could be in the path of materials.
If parking, building access, elevator reservations, or condominium rules apply to your home, arrange those details in advance. Let the team know about any site considerations, such as a narrow driveway, a security gate, or a pet that must remain indoors. These small details help the day begin calmly and on schedule.
You can also ask where tools and materials will be staged, whether the kitchen sink will be available during the work, and how dust protection will be handled for the specific scope of your project. Refacing involves far less demolition than a full renovation, but every home and project has its own needs.
Avoid Last-Minute Changes and DIY Tear-Out
Once your design, measurements, and materials are approved, avoid making changes unless they are truly necessary. Custom doors, drawer fronts, and finishing components are made to fit your kitchen precisely. A late appliance swap or a new idea for a cabinet conversion can affect the plan, timing, and final installation.
It is also best not to remove doors, hardware, backsplashes, or cabinet components on your own unless your project team has specifically asked you to. What appears simple can expose unfinished surfaces, damage walls, or create a detail that needs additional repair. The goal is minimal disruption, not extra work for your household.
Keep One Small Kitchen Routine Going
You may not have full use of your kitchen during installation, but you can make those few days much easier with a simple temporary setup. Set aside mugs, a kettle or coffee maker, basic dishes, snacks, and any medications or pet supplies you use daily. If possible, plan a few meals that require little preparation, or enjoy takeout from a favorite local spot.
This is not about pretending the kitchen is fully operational. It is about making a short, focused installation feel manageable rather than inconvenient. With a little planning, the temporary pause is easier to appreciate when you see the finished space take shape.
A well-prepared home gives your project the best possible start, but you should never have to figure it all out alone. The right specialist will walk you through what needs to happen, what can stay exactly where it is, and which decisions deserve attention before installation. Then you can look forward to the best part: opening the door to a kitchen that feels like yours again – only better.